
January CSA
This Month’s Share
This month’s veggie share includes onions, garlic, daikon radish, pumpkins, fingerling potatoes, Siberian kale, and sweet potatoes. The meat share this month includes a quart of frozen lard, 3-4 lbs of ground beef, and variety cuts of beef. Don’t be afraid of the lard. You can use it to make the best pie crust you have ever made (I recommend the Joy of Cooking recipe) maybe to go along with that pumpkin in your veggie CSA, the biscuit and flour tortilla recipes below, or in place of oils and butter for sautéing this month. Give it a shot, it has a lower smoking point then many oils and lends a delicious subtle flavor to whatever you are cooking!
Pick Up Reminders
It’s been a whole month! Here are some little reminders as we head into our 3rd winter CSA pick up. We are looking forward to seeing you tomorrow afternoon! If you know you won’t be able to pick up your share on Thursday, please email us so we don’t get worried. You can always come out on Saturday to the Farm Store and pick it up.
There are 4 easy steps to picking up your Winter CSA:
Step 1: Find the person with the clipboard on or near the back of the truck to get your name checked off the list.
Step 2: Pick up your meat share and any other add-ons or purchases you would like to make at the back of the truck.
Step 3: Go to the back of the trailer and chat with Sarahlee while you pick up your veggie share after you have your name checked off the list.
Step 4: Enjoy all your goodies!
Don’t forget your reusable shopping bags & masks!
And a reminder of our pick up times & locations:
SISTERS 2:30-2:40PM (Thursdays)
- We’ll be across the street from Oliver Lemon’s Market. Note: we are not affiliated with Oliver Lemon’s. Please do not ask them for anything related to the CSA.
REDMOND 3:30-3:40PM (Thursdays)
- We’ll be parked at the Centennial Park downtown.
BEND 4:30-5:30PM (Thursdays)
- We will be at the Deschutes Main Services Building north parking lot at 1300 NW Wall Street.
ON FARM pick up (SATURDAYS) 11:00-3:00PM
- Saturday pick up is at our Farm Store and is two days after the deliveries to Sisters, Redmond, and Bend. 71290 Holmes Rd, Sisters OR 97759. Note: if you signed up for On Farm pick up, that is only available on Saturday!
Please EMAIL us if you have any questions about your CSA or if you can’t remember where you are scheduled to pick up your share.
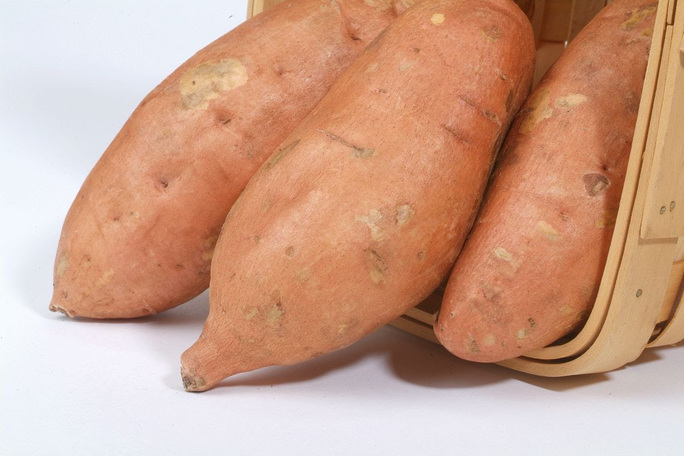
Sweet Potatoes
We were hoping to have sweet potatoes to share with you at least until April, but, as happens on farms and in life, they appear to have gotten away from us. This means, that you will all be receiving the last of the sweet potatoes in your January CSA. They will all be trimmed and look like they have been cut into, but they should all be good to go. Make sure you prioritize using these first out of your CSA box this month. They won’t be able to store long at all.
Sweet potatoes are very labor intensive to grow and harvest and are definitely not native to Central Oregon, but we love them and are on year 2 of growing them at Rainshadow Organics. These beautiful orange tubers are a new world vegetable originating in Central and South America and are high in anti-oxidants, fiber, vitamin C, and potassium making them a great vegetable to have in your cooking quiver this time of year.
We grow the Orleans variety and they start as live slips and are overnight shipped to us from an organic sweet potato purveyor in North Carolina. Sweet potatoes can only grow inside hoop houses in Central Oregon, which works well for us, but they have a hard time sharing space with other plants due to their water needs. Sweet potatoes need to be hardened off in the ground before they can be harvested and this means turning off their water earlier than other plants. This makes it difficult to find partner plants for them in our hoops. Additionally, harvesting sweet potatoes is a true excavation procedure. After the sweet potatoes are hardened off, they have to be carefully picked by following vines along the ground and digging down in the soil until you find the cluster of sweet potatoes. This can be slow and tedious while you make sure that you aren’t cutting all the sweet potatoes with the shovel, broad fork, or other sharp harvest tool you are using. All of this takes time and care.
After the sweet potatoes are harvested, they need to cure in a warm place with a high relative humidity for 2-3 weeks. While we nailed that last year, we didn’t do so well on that front this year. As we are sorting through and trimming sweet potatoes, we are also discussing how best to harvest, cure, and store sweet potatoes in 2021. We hope that this can be an unrepeated mistake. No matter what farming is, it always provides opportunities to learn from our mistakes and improve on things.
What we can honestly say is that we have never lost a storage crop this quickly. We checked out the sweet potatoes 3 weeks ago, and life was good. Last week they started looking a bit funky. This week, we are hand trimming all the sweet potatoes so all our CSA members can enjoy the salvageable parts of our sweet potato crop. We hope you enjoy your sweet potatoes this month. We encourage you to enjoy or preserve all your sweet potatoes before the week is done.
Sweet Potato Preservation Tips & Tricks
Here are some tips for preserving the sweet potatoes you don’t use by the end of the week:
Sweet Potato Chips
(from vegetariantimes.com)
Great for keeping sweet potatoes another couple weeks, max.
Ingredients
1 tsp salt1 tsp chili powder
1/2 tsp ground cumin
1/2 tsp ground coriander
1/2 tsp ground pepper
1/4 tsp ground cayenne
1 lb sweet potatoes, scrubbed & peeled
1 Tbs olive oil (or melted lard!)
- Preheat oven to 250F
- Combine salt and spices in mixing bowl.
- Slice sweet potatoes paper-thin and toss lightly with oil then spice mixture until evenly coated. Arrange potatoes on a wire grates sprayed with nonstick vegetable spray or on baking sheets fitted with parchment paper.
- Bake for 2 hours, then turn off oven and let potatoes dry for 2 more hours or overnight. Alternately, dehydrate sweet potato slices in dehydrator according to manufacturer’s directions.
- **You can scale up or down this recipe depending upon how many sweet potatoes you have.**
Sweet Potato Fries
(from stockpilingmoms.com)
Ingredients
2 large sweet potatoes, peeled
Instructions
- Slice sweet potatoes into strips or however you want to eat them as fries.
- Bring a pot filled with water to a boil.
- Boil fries for 5 minutes.
- Place in a strainer and rinse with cold water right away to stop the cooking process.
- Place on cooking sheet and put in freezer for an hour to flash freeze them.
- At this point you can either put in a ziploc bag or other freezer storage container to cook them later or continue on and bake for immediate eating.
- Preheat oven to 400F.
- Bake in oven for 8-10 minutes or until done.
Freezer Preserving Sweet Potatoes
Chunks of Sweet Potatoes: (great for soups & chilis, to add to roasted root vegetables at the end of roasting, making into purée, etc.)
Peel sweet potatoes, slice into 1/2 inch slices or cut into chunks, and steam.
Allow pieces to come to room temperature.
Flash freeze cooked sweet potatoes by spreading them on a baking pan in a single layer and placing in the freezer.
When frozen put in a ziploc bag or other freezer safe storage container.
Use in 12 months.
Baked Sweet Potatoes
- Preheat oven to 375F.
- Wash sweet potatoes, rub in oil, and poke with a fork for vent holes.
- Place the sweet potatoes on a baking sheet, or place a tray on a lower rack and sweet potatoes directly on upper racks. Bake for 1.5-2 hours.
- Allow to cool, then wrap in foil, then place in freezer. Consider putting foil packs into plastic freezer bags to organize.
- Use in 12 months.
Sweet Potato Purée: (Great for muffins, breads, smoothies, mashed sweet potatoes later.)
- Wash sweet potatoes and decide if you want to roast or steam them.
- To roast: preheat oven to 375F and roast whole for 1.5-2 hours.
- To steam: bring a pot of water to boil with a steamer basket. Steam potato for 30+ minutes depending upon size.
- Allow sweet potatoes to cool down to the point of being able to handle and scoop flesh from skin and purée.
- Allow to fully cool and put in airtight containers. Use in 12 months.
Fingerling Potatoes
In your January Veggie CSA, you will also get Rainshadow Organics Fingerling Potatoes. Did you know our fingerling potatoes were created right here on our farm? You truly cannot get these anywhere else!
In 2012 Sarahlee dedicated 10 acres to planting 27 different varieties of potatoes as she tried to figure out the best potato to grow in our little corner of Central Oregon. The Purple Viking potato won the competition, hands down, and that is the potato that we grow the most for our CSAs, restaurant, and wholesale partners. Every year we also dedicate a portion of our potato crop to our Rainshadow Organics fingerling potato.
As part of the great potato experiment of 2012, we grew fingerling potatoes. At the end of the growing season, we discovered a naturally hybridized fingerling potato: a cross between a Purple Peruvian Fingerling and a Viking Purple. It took us 4 years to take this potato from a single plant to enough seed potatoes to grow a big enough crop for our uses, but we did it! Our fingerling potatoes can be used in any recipe that call for Fingerling potatoes. These are truly local potatoes!
These potatoes are currently nameless. Keep your eyes on our Instagram and Facebook accounts for a friendly naming competition starting soon. In the meantime, cook up some fingerling potatoes and get those creative juices flowing!Balsamic Roasted Fingerling Potatoes
(from cookingontheside.com)Ingredients
1 1/2-2 lbs fingerling potatoes
1 1/2 Tbs olive oil
2 Tbs balsamic vinegar
2 tsp chopped fresh thyme
1/2 tsp coarse sea salt
1/4 tsp ground pepper
2 tsp chopped fresh chives (or onion tops)
Directions
- Preheat oven to 400F.
- Halve the fingerling potatoes or leave whole if small. The goal is to have them be all the same size in order to cook evenly.
- In a large bowl, toss the potatoes with olive oil, balsamic vinegar, thyme, salt & pepper. Spread the potatoes onto a rimmed baking sheet. Roast 30-40 minutes until cooked through and crispy on the outside stirring occasionally.
- Garnish potatoes with chives before serving.
Roasted Purple Potatoes with lemon, dijon & thyme dressing
(from shelikesfood.com)
Ingredients
3 lbs purple fingerling potatoes
1 1/2 Tbs olive oil
1 tsp salt
1/4 tsp black pepper
Lemon Dijon Thyme Dressing
1/4 cup olive oil
1 Tbs dijon mustard|
2 Tbs lemon juice
2 tsp chopped fresh thyme
2 garlic cloves, minced
1/4 tsp salt
pinch black pepper
Directions
- Preheat oven to 400F.
- Line a large sheet pan with parchment paper. Place sliced potatoes on the pan and toss with olive oil, salt, and pepper. Spread out potatoes into an even layer and roast until fork tender and browned, about 40 minutes.
- While potatoes are roasting, make the dressing: add all dressing ingredients to a small bowl and whisk until combined. Each person can spoon their desired amount of dressing over their potatoes before eating.
Recipe Corner
This week is heavy on the recipes, but here are a few more. You will be getting a lot of daikon radishes this week, so here are two quick refrigerator pickle recipe for daikon radish. In addition, this will be the last pumpkins you’ll see for the winter, so I’ve included a recipe for making pumpkin purée. You can freeze pumpkin purée and it will last for months. a 15 oz can of pumpkin purée is about 1 1/2 cups. Finally, if you have a meat CSA, you are getting lard and I have included a couple recipes for lard.
Daikon Radish Quick Pickles
(from pupswithchopsticks.com)
makes 1 jar, no canning necessaryIngredients
1 small daikon radish
1 Tbs salt
1 clove garlic (optional)
1 chili pepper (optional)
Vinegar Brine
1/2 cup white vinegar (or rice vinegar)
1/2 cup + 2 Tbs hot water
1/2 cup sugar
Instructions
- Preparing the Daikon Radish:
- Wash and peel the daikon radish. Cut the daikon to the shape you prefer (thin matchsticks, thick sticks, or cubes) and put in a large bowl. Add 1 Tbs salt and massage it into the freshly cut radish. Let the radish sit for 15 minutes while it draws out the bitter water. Once the 15 minutes is up, rinse the daikon well with cold water and set aside.
- Making the Brine: In a separate bowl, mix together all the Vinegar Brine ingredients and set aside. Taste the vinegar solution to see if it is sweet or tart enough for your preference. (Optional: peel and smash 1 clove garlic to flatten it and release its juices and put it in the brine.)
- Putting it Together: Add the daikon radish to glass jar and cover with vinegar brine until the daikon is fully submerged in it. If you want your pickles garlicky or spicy, add smashed garlic and whole chili peppers into the jar as well. Seal the jar well and let it sit in the fridge for a minimum of 2 hours but preferably 24 hours.
Notes
You can store these for up to 2 months, but they taste best within the first month.
You can also add carrots to the daikon as well.
If you need more pickle juice, double the pickle juice portion of the recipe.
Sweet Pickled Daikon Radish
(from Tyler Florence on foodnetwork.com)
makes 1 quart; no canning necessary
Ingredients
1 cup rice vinegar
1 cup water
1 cup sugar
1/4 tsp turmeric
1 lb daikon radish
1/4 cup kosher salt
Instructions
- In a small saucepan over medium heat add the vinegar, water, sugar, and turmeric. Bring to a boil, stirring to dissolve the sugar. Remove from heat and allow to cool.
- Meanwhile, peel the daikon radish and slice into 1/4-inch thick rounds. (If your daikon is very large, slice the rounds into semicircles.) Place in a colander with salt and mix well. Place the colander over a bowl and let drain for 1 hour. Rinse the salt off with a couple changes of water and dry the daikon well. Put into a sterilized glass jar. Pour the cooled brine through a coffee filter (or a cheesecloth lined strainer) into the jar to cover the radish slices. Refrigerate at least 4 hours, preferably overnight. Will keep for about 2 weeks.
")
Questions or Comments?
Send us an EMAIL if you have any questions or comments about the newsletter, the farm, or the restaurant. We will answer as best we can. Chances are, someone else has that question too and we might address it in a future newsletter for everyone to learn from!